Deploying Pi-Hole in Docker Using Ansible
Now begins the first real post of the Self-Hosted-Journey series. I'll be sharing my experience of running Pi-hole with docker on our ubuntu server. I'll look at configuring Pi-hole and using it as a local DNS, finally I'll be simplifying the whole process and making it reproducible with ansible.
What is Pi-Hole?
If for some reason you have made it here without knowing what Pi-hole is, at its core, Pi-hole is a DNS-based ad blocker that blocks ads and trackers at the network level. This means that every device connected to your network benefits from ad and tracker blocking, without needing to install additional software on each device. Pi-hole also includes a DNS server that caches frequently accessed websites, resulting in faster browsing speeds. Additionally, Pi-hole can act as a DHCP server, providing IP addresses to devices on your network and allowing you to manage your network with ease. Pi-hole is open-source and highly configurable, so you can tailor it to your specific needs. With Pi-hole, you can enjoy increased online privacy, reduced exposure to malware and phishing scams, and greater control over your network. Pi-hole is an excellent tool for those who want to take control of their online experience and protect their network from unwanted ads and trackers.
Deploying with Docker
First things first, let's have a quick look at deploying pihole manually with docker and take a look at how it's configured.
Looking at the quick-start from the official docker image, they recommend using a docker-compose file, however I'm looking to avoid a growing collection of docker-compose files to look after in the future, so I will not be using this for our initial experimentation. It does however give us a nice starting point to work from.
The compose file:
version: "3"services:pihole:container_name: piholeimage: pihole/pihole:latest# For DHCP it is recommended to remove these ports and instead add: network_mode: "host"ports:- "53:53/tcp"- "53:53/udp"- "67:67/udp" # Only required if you are using Pi-hole as your DHCP server- "80:80/tcp"environment:TZ: 'America/Chicago'# WEBPASSWORD: 'set a secure password here or it will be random'# Volumes store your data between container upgradesvolumes:- './etc-pihole:/etc/pihole'- './etc-dnsmasq.d:/etc/dnsmasq.d'# https://github.com/pi-hole/docker-pi-hole#note-on-capabilitiescap_add:- NET_ADMIN # Required if you are using Pi-hole as your DHCP server, else not neededrestart: unless-stopped
The key pieces of info that I can see in this compose are:
- the timezone environment variable
- the password environment variable
- the volumes that probably store configuration
Ofcourse I could probably find all of this info in the docs, but where's the fun in that?
Now let's try an initial deployment.
sudo docker run \-p 80:80 -p 53:53/udp -p 53:53/tcp \-e "TZ=Europe/London" -e WEBPASSWORD=password \-v ~/pihole/etc-pihole:/etc/pihole -v ~/pihole/etc-dnsmasq.d:/etc/dnsmasq.d pihole/pihole:latest
note: obviously no one should be using a password of password for a real deployment of anything
Upon running this we run into our first issue, specifically: listen tcp4 0.0.0.0:53: bind: address already in use.
Interesting, what could already be listening on this port?
After a little googling it turns out the systemd-resolved runs a DNS stub resolver that listens on port 53. Simple enough
to fix, we just won't use systemd-resolved for dns resolution. It's arguable if there are advantages and disadvantages
to this approach, but this is what we will do.
First we will stop and disable systemd-resolved.
sudo systemctl stop systemd-resolvedsudo systemctl disable systemd-resolved.service
Then we will update our netplan file in /etc/netplan/00-installer-config.yaml as follows:
network:ethernets:enp7s0:dhcp4: truenameservers:addresses: [1.1.1.1/32, 1.0.0.1/32]version: 2
Then we will apply our changes with
sudo netplan apply
We then restart our system and verify dns resolution still works by pinging a website, and it works just fine.
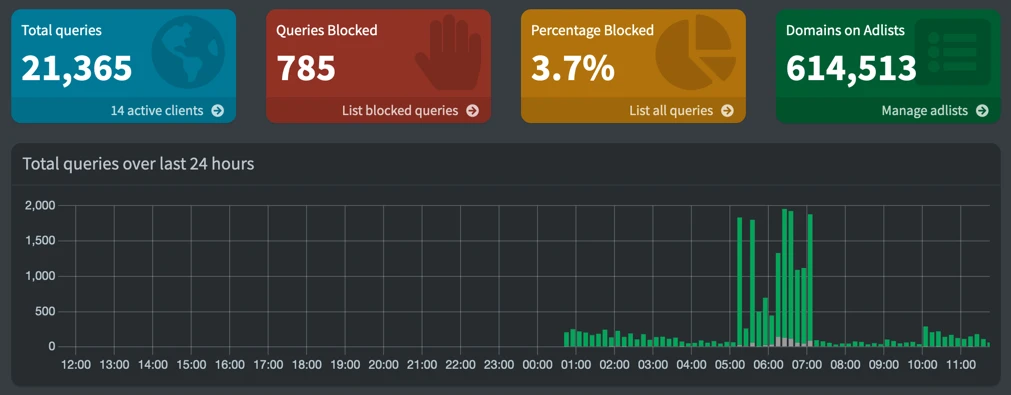
Now we attempt to run the container again, and success, we have the pihole admin page available.
Configuring Pi-hole
Now that it's up and running, let's try and understand how the configuration is stored.
A quick cursory glance at the documentation reveals that a configuration backup can be created via the web gui or with
the command pihole -a -t. This automatically creates a nice .tar.gz of all the configuration. So now that we know
how to create a backup of the configuration files, we will also be able to modify them and replace them when needed in
the future. The easiest way to create our initial setup is to just use the web console and then use the teleporter
for a backup.
Initial Setup.
There are only a few settings that I am personally interested in changing and maintaining.
First I want to disable domain and client logging. I am not the only person in my house and I believe it would be wrong
for me to have an easily available log of what people were browsing in my household. If you want this logging, I heavily
implore you to ask your family members, housemates, or whoever you share a network with if they would mind you having a
log of every website they visit. I think we can all guess the answer. So the first step is to disable query logging in
the system tab of the settings:
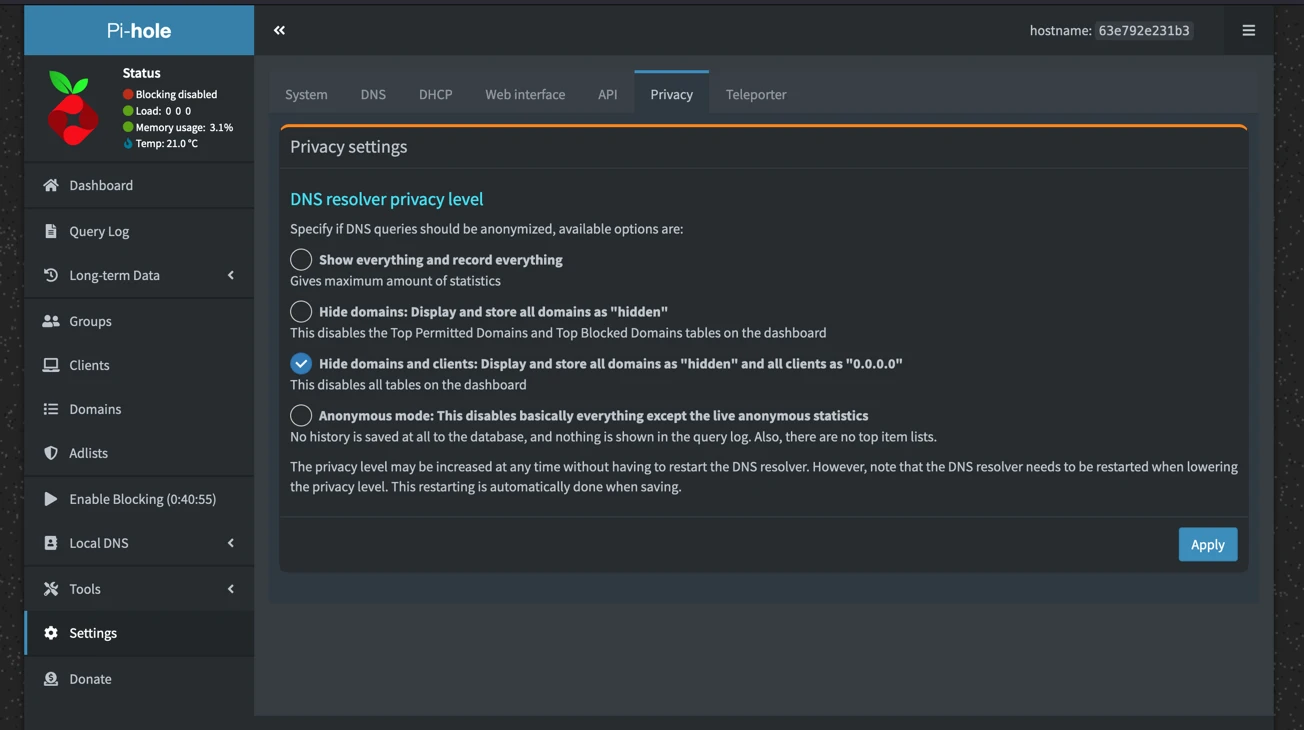 And then in the privacy tab we set the DNS resolve privacy level to one above anonymous mode:
Now we'll look at the DNS settings. First I want to change the upstream servers from google to cloudflare, simply because I am in the "avoid google wherever possible club". We won't define any custom servers, and we will leave the interface settings as is. If you're wondering why it's not defaulting to the recommended setting of local devices only, this is because we are running pi-hole from docker, and the recommended setting would prevent other devices on the network from using the pi-hole dns. If you are going to use this setting, make sure you have a firewall setup and your pi-hole is not exposed publicly. The rest of the settings on this page we are leaving unchecked. We won't be using conditional forwarding or using pi-hole for dhcp, primarily because we are running with no real logging.
Local DNS Setup
Now that we have the pi-hole specific settings setup, let's implement a wildcard local DNS record. For those that don't know, a wildcard record would be one like *.sham.lan, meaning that any request for any subdomain of sham.lan will be directed to the same IP. While it is possible to have a wildcard dns record e.g. *.sham.lan, it's not possible to implement this through the web gui. To do this we will need to add a record to the dnsmasq config directly. This is very simple to do, first we create a file in our volume.
sudo touch 02-custom-wildcard.conf
Then we edit it and insert the line address=/sham.lan/192.168.5.22
Finally, we restart the container and visit a random subdomain, e.g. http://foo.sham.lan/admin and once again we are greeted by the pi-hole admin. Another success. While this wildcard rule seems pointless right now, it will become useful when we set up a reverse proxy and have more than one service.
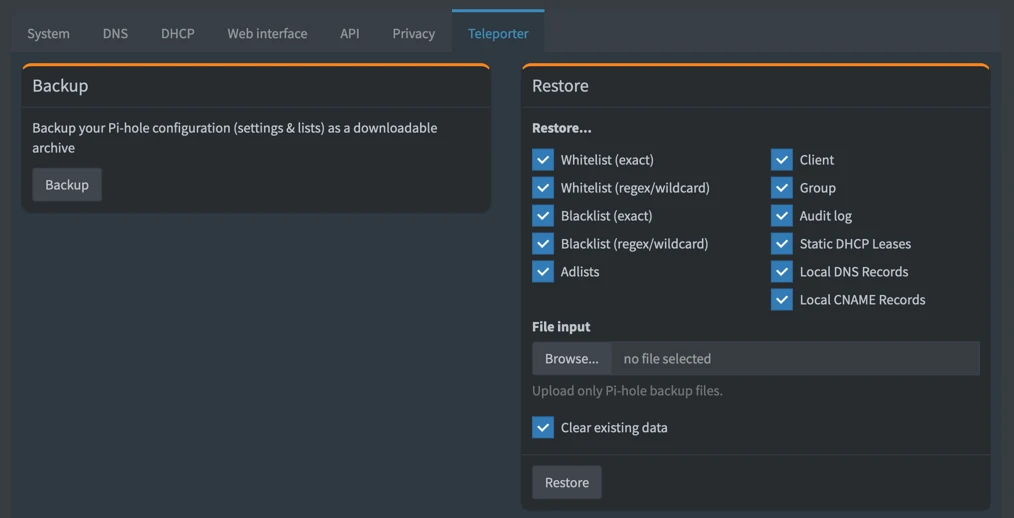
Saving Our Config
Now that we have everything setup how we want it, we should use the teleporter to save our configuration. Since we are
already in the web gui, we will just use the teleporter here instead of running the pihole -a -t command. A couple of
clicks in the settings tab, and we have our config downloaded ready for later.
Simplifying this Deployment
Now let's ensure that we can reproduce the same setup quickly and easily in the future. As you may have noticed, there were a number of steps involved in the manual deployment and configuration process, and running them through again would be tiresome. This is where Ansible comes in. We can use Ansible to automate the entire process, from installing and configuring Docker, to setting up Pi-hole with our desired settings. By automating these steps, we can ensure consistency across different deployments, save time and effort, and reduce the chances of errors. So let's dive into using Ansible to make our Pi-hole setup reproducible.
So let's start by listing what we did in an order that would work with no hiccups.
- Disable systemd-resolved and it's service
- Update our netplan config file
- Apply our netplan config file
- Create our host volume dirs
- Populate them with our dnsmasq and pi-hole config
- Run the container with the correct parameters
Now steps 1 - 3 are dependent on the fact our server runs Ubuntu 22, while the remainder would be applicable no matter what our platform is. With that in mind we will create 2 different roles, for these 2 groups in our homelab playbook. Unfortunately only the dnsmasq config files can be easily loaded in this way, as there is currently no builtin api for importing a teleport backup, excluding the web gui. And I want to afford writing a script to automate this for this post , therefore we will only be able to automatically load our dnsmasq config and have to manually import our backup.
Creating the Playbook
We start by creating our playbook folders:
server-playbook/├── roles/│ ├── pi-hole/│ │ ├── meta/│ │ │ └── main.yml│ ├── ├── files/│ │ │ └── etc-dnsmasq.d/│ │ └── tasks/│ │ └── main.yml│ └── ubuntu-22-dns/│ ├── handlers/│ │ └── main.yml│ ├── meta/│ │ └── main.yml│ └── tasks/│ └── main.yml├── handlers/│ └── main.yml├── inventory└── main.yml
The inventory contains the server ip
192.168.5.22
The meta folders main.yml are bare bones and the same across all meta folders:
---dependencies: []
It might feel like it makes sense to make the pihole role to depend on the dns role, but this assumes that pi-hole will always be running in this machine. This is likely to change in the future, and to reduce future work, we will not make this assumption.
Now the tasks main.yml for the ubuntu-22-dns role:
---- name: Ensure systemd-resolved is stopped and disabledsystemd:name: systemd-resolvedenabled: falsestate: stopped- name: Ensure netplan contains nameservercopy:content: |network:ethernets:enp7s0:dhcp4: truenameservers:addresses: [1.1.1.1/32, 1.0.0.1/32]version: 2dest: /etc/netplan/00-installer-config.yamlnotify:- Apply netplan
Fairly self-explanatory, we disable the systemd-resolved service and stop it if it's running. We then ensure that the
netplan contents match our expectations, and if the destination did not match it will copy over the given content over.
If this copy occurs it will notify the Apply netplan handler in the handlers folder.
The handler is also very simple:
---- name: Apply netplancommand: sudo netplan applyasync: 45poll: 0
With all these tasks done, the dns changes we had to make previously are now automated.
Next we need to make use of ansible vault to encrypt our pi-hole web password, this will become more clear after. To do this we simply run
ansible-vault encrypt_string <password> --name pihole-webpassword
With the password encrypted we can then create the pi-hole role:
---- name: Ensure dnsmasq config volume files existcopy:src: "{{ item }}"dest: /home/sham/pihole/with_items:- files/etc-dnsmasq.d- name: Ensure pi-hole container is runningdocker_container:name: piholeimage: pihole/pihole:latestrestart_policy: unless-stoppedports:- 80:80- 53:53/udp- 53:53/tcpvolumes:- /home/sham/pihole/etc-pihole:/etc/pihole- /home/sham/pihole/etc-dnsmasq.d:/etc/dnsmasq.denv:TZ: Europe/LondonWEBPASSWORD: !vault |$ANSIBLE_VAULT;1.1;AES256333734313336326366323061323164616430343935643438333234323738636333353133666562313361666530306266613962383064333564393534393334650a326432323432313566313437313637643966613166383533623736333036653965333633633436346661646239363835626438623531393765333933613438660a6266396139613961393430316239346434653830346339316333663935333739
This is another simple set of tasks. We ensure the dnsmasq.d config exists in the correct volume directory, and then we start the container with the correct parameters. These are the same options as before, with the addition of the restart policy. We also used the encrypted ansible secret so that we can set the password securely.
Finally, we create the playbook main.yml:
---- hosts: allbecome: yesroles:- ubuntu-22-dns- pi-hole
With the playbook setup I can now stop and delete all containers, delete all the volumes, and reset my dns settings. I run the playbook with:
ansible-playbook -i inventory -K --ask-vault-password main.yml
The playbook takes about 60 seconds to run, and once it has, I am able to once again access the pihole admin console on http://sham.lan/admin and all that's left to do is go to the settings tab and import the previous downloaded teleport backup. And just like that we are back to where we were, pi-hole is deployed and configured, only this time it took about 60 seconds.
To Conclude
In this first post of the Self-Hosted-Journey series, we explored how to set up Pi-hole with Docker on our Ubuntu server. We learned what Pi-hole is, how it works, and its benefits. We also saw how to configure it and create a wildcard local DNS record. We then looked at how we can simplify the process of deployment and configuration using Ansible. We created two roles, one for disabling systemd-resolved and updating netplan and another for deploying and configuring Pi-hole. In the next post in the series, we will take a look at how to set up a reverse proxy for our services on our server.